一、前言
本文编译和架设方法较为繁琐和细致,且涉及到搭建注册网站和对外开放服务部分,故再次声明:本网站均为技术研究,若参考本网站教程搭建对外服务,我均不负任何责任!
二、系统环境
本文所述命令均为在 ubuntu 20 及以上版本环境,root 账户下执行,若你用的是非 root 账户,请输入 su root 切换至 root。另外本文默认你对 Linux 稍微有基本认识,如何 SSH 连接服务器、如何 vim 编辑什么的就不用说了吧。
我习惯用的工具是 Finalshell ,集 SSH 和 FTP 工具于一身,当然你也可以选择别的工具。输入此代码安装服务器环境:
apt-get update && apt-get install git cmake make gcc g++ clang libmysqlclient-dev libssl-dev libbz2-dev libreadline-dev libncurses-dev mysql-server libboost-all-dev vim rename screen gdb在此期间显示 “Do you want to continue? [Y/n]” 的,输入 y 回车即可,下文若出现类似提示将不再赘述。期间如果让你输入国家,请依次输入 6 和 70,选择正确的时区。
三、源码编译
(一)下载源码
mkdir /root/games/ && cd /root/games/ && git clone https://github.com/azerothcore/azerothcore-wotlk.git --branch master --single-branch azerothcore如果出现:
fatal: unable to access ‘https://github.com/azerothcore/azerothcore-wotlk.git/’: GnuTLS recv error (-110): The TLS connection was non-properly terminated.请重新输入一遍命令。
(二)功能安装
这个链接是官方 Github 存储库,里面有众多的功能模块,如果你英文不好的话,多用下翻译。下载解压后使用 FTP 类工具,将文件夹上传到 /root/games/azerothcore/modules 目录。
温馨提醒:src 文件夹内有后缀为 cpp 的文件,如果你想修改模块源码,可以使用 Notepad++ 等工具进行编辑。如果下载的模块有后缀,即“-master”。需要将其删除才能使模块正常工作!
(三)构建编译
cd /root/games/azerothcore && mkdir build && cd build && cmake ../ -DCMAKE_INSTALL_PREFIX=/root/games/azeroth-server/ -DCMAKE_C_COMPILER=/usr/bin/clang -DCMAKE_CXX_COMPILER=/usr/bin/clang++ -DWITH_WARNINGS=1 -DTOOLS=0 -DSCRIPTS=static && make -j 20 && make install如果编译中出现错误,请自行排错后重新编译,编译完成后的服务端在 /root/games/azeroth-server 目录。
四、服务端设置
(一)Data 文件
点此链接下载并解压官方的 data 文件,或者将你自行提取的 data 文件,使用 FTP类工具,将 data 文件夹上传到 /root/games/azeroth-server 目录。
(二)数据库安装
vim /etc/mysql/mysql.conf.d/mysqld.cnf按i进入编辑模式,在“bind-address= 127.0.0.1”前面输入#,按Esc,输入“:wq”回车保存退出。
service mysql restart重启 MySQL 。
mysql -uroot -p回车,弹出 Enter password 让你输入密码时,继续回车(第一次登陆时处于无密码状态,故跳过直接选择回车即可进入),登录 MySQL 。
use mysql;ALTER USER 'root'@'localhost' IDENTIFIED WITH mysql_native_password BY 'gswxy.com';此处为修改 MySQL 的 root 密码,新密码即你自己设置的密码,这里我设置为了gswxy.com,不要忘记!
update user set host = '%' where user ='root';FLUSH PRIVILEGES;exit;温馨提醒:如果你加了功能模块,在其文件夹内可能会有 data 或 sql 文件夹,里面有 SQL 文件,请在后面服务端启动前使用 HeidiSQL 或 Navicat 等工具导入数据库。
(三)设置配置
建立 worldserver.conf 和 authserver.conf 配置文件:
cp /root/games/azeroth-server/etc/*.dist /root/games/azeroth-server && cd /root/games/azeroth-server && rename 's/.dist$//' *.dist && mv /root/games/azeroth-server/*.conf /root/games/azeroth-server/etc接下来可依次输入:
vim /root/games/azeroth-server/etc/authserver.confvim /root/games/azeroth-server/etc/worldserver.conf命令来修改服务器配置,需要注意的是,需要修改 conf 文件里以下内容:
LoginDatabaseInfo = "127.0.0.1;3306;acore;acore;acore_auth" worldserver.conf #此字段authserver.conf和worldserver.conf都有
WorldDatabaseInfo = "127.0.0.1;3306;acore;acore;acore_world" worldserver.conf #此字段仅worldserver.conf有
CharacterDatabaseInfo = "127.0.0.1;3306;acore;acore;acore_characters" worldserver.conf #此字段仅worldserver.conf有
DataDir = "." #此字段仅worldserver.conf有,将.更改为你的data文件夹路径,比如我改成了:DataDir = "/root/games/azeroth-server/data"
上述字段内的第一个 acore 是数据库用户名,第二个 acore 是数据库密码,请更改为自己的。另外如果你前面添加了功能模块,则需要执行以下命令生成配置文件:
cp /root/games/azeroth-server/etc/modules/*.dist /root/games/azeroth-server && cd /root/games/azeroth-server && rename 's/.dist$//' *.dist && mv /root/games/azeroth-server/*.conf /root/games/azeroth-server/etc/modules功能模块的所有配置文件均在 /root/games/azeroth-server/etc 里,请修改后缀为.conf 的文件。
(四)外网设置
使用 HeidiSQL 或 Navicat 等工具连接数据库,打开 acore_auth 数据库的 realmlist 表。其中 address 栏,如果你想提供对外服务,请填写你服务器的公网 IP 地址或者域名,如果你只是想局域网的伙伴连接你的服务端,请填写你本机的局域网 IP 地址。另外 name 可自定义为你服的名字,改完后不要忘记按 Ctrl+S 保存。
(五)启动脚本
cd /root/games/azeroth-server/bin && vim auth.sh然后输入以下脚本:
!/bin/sh
while :; do
./authserver
sleep 20
done
退出编辑后,输入 vim world.sh,然后输入以下脚本:
!/bin/sh
while :; do
./worldserver
sleep 20
done
退出编辑后,输入 vim restarter.sh,然后输入以下脚本:
!/bin/bash
screen -AmdS auth ./auth.sh
screen -AmdS world ./world.sh
退出编辑后,输入 vim shutdown.sh,然后输入以下脚本:
!/bin/bash
screen -X -S "world" quit
screen -X -S "auth" quit
退出编辑后,输入:
chmod 777 /root/games/azeroth-server/bin/*.sh常用命令有:
- 输入 cd /root/azeroth-server/bin && ./restarter.sh 可启动服务端;
- 输入 screen -r auth 或者 screen -r world 可以查看控制台,同时按 Ctrl+A+D 键可退出窗口,但不会结束进程;
- 输入 cd /root/azeroth-server/bin && ./shutdown.sh 可关闭服务端。
五、注册网站
(一)环境安装
apt update && apt install nginx php-fpm php-gmp php-gd php-soap php-mbstring php-pdo php-pdo-mysql然后输入 vim /etc/nginx/sites-available/default,将 location ~ .php$ {、include snippets/fastcgi-php.conf;、fastcgi_pass unix:/var/run/php/php8.1-fpm.sock; 和下面的} 前面的#去掉,如图所示:
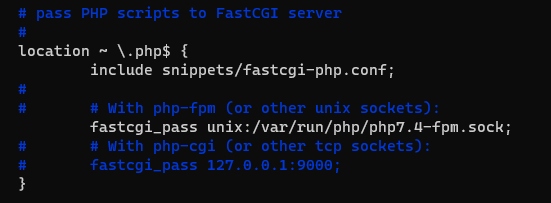
并在 index 后面输入 index.php,如图所示:

退出编辑后,输入 service nginx restart && service php8.1-fpm restart 重启服务。
请注意,上述php8.1,请替换为你自己的php版本号,可以输入 php -v 查看。
(二)网站搭建
注册网站推荐 WoWSimpleRegistration,点击此处下载压缩包解压,将 application/config/ 内的 config.php.sample 文件复制并重命名为 config.php,config.php 文件就是该源码的配置文件,推荐使用 Notepad++ 工具打开,里面每项都有详细的英文解释,不懂的请自行翻译,常见修改如下:
=====================================================================
$config['baseurl'] = "localhost";  #本地访问默认为localhost,外网访问请正确更正为你的网址,否则图片路径错误不显示
=====================================================================
=====================================================================
$config['language'] = "chinese-simplified";  #修改默认语言为中文
=====================================================================
$config['realmlist'] = 'IP地址';  #IP地址替换为你的局域网或外网地址
$config['patch_location'] = 'http://mypatch.com/patch.mpq';  #其中http://mypatch.com/patch.mpq更改为你更新包的地址,可不修改
=====================================================================
$config['expansion'] = '2';  #修改为0,以适配wlk客户端
=====================================================================
$config['server_core'] = 1;  #修改为1,以适配AC源码
=====================================================================
$config['disable_changepassword'] = true;  #修改为true,否则在开启SOAP后会出现异常
=====================================================================
$config['template'] = 'advance';  #此处为主题选择,我这里选的是advance
=====================================================================
#以下为邮箱设置,请设置为自己的邮箱STMP信息
$config['smtp_host'] = 'smtp1.example.com';
$config['smtp_port'] = 587;
$config['smtp_auth'] = true;
$config['smtp_user'] = 'user@example.com';
$config['smtp_pass'] = 'SECRET';
$config['smtp_secure'] = 'tls';
$config['smtp_mail'] = 'no-reply@example.com';
=====================================================================
$config['soap_for_register'] = true;  #开启SOAP
=====================================================================
$config['soap_uri'] = 'urn:AC';  #更改为urn:AC,以适配AC源码
=====================================================================
$config['soap_username'] = 'gswxy';  #输入你服务端的一个GM号的用户名
$config['soap_password'] = 'gswxy.com';  #输入你服务端的一个GM号的密码
=====================================================================
#顾名思义,以下内容更改为你acore_auth数据库的信息
$config['db_auth_host'] = '127.0.0.1';
$config['db_auth_port'] = '3306';
$config['db_auth_user'] = 'root';
$config['db_auth_pass'] = 'gswxy.com';
$config['db_auth_dbname'] = 'acore_auth';
=====================================================================
#顾名思义,以下内容更改为你acore_characters数据库的信息
$config['realmlists'] = array(
    "1" => array(
        'realmid' => 1, // Realm ID
        'realmname' => "GSWXY", // Realm Name
        'db_host' => "127.0.0.1", // MySQL Host IP
        'db_port' => "3306", // MySQL Host Port
        'db_user' => "root", // MySQL username
        'db_pass' => 'gswxy.com', // MySQL password
        'db_name' => "acore_characters" // Characters database name
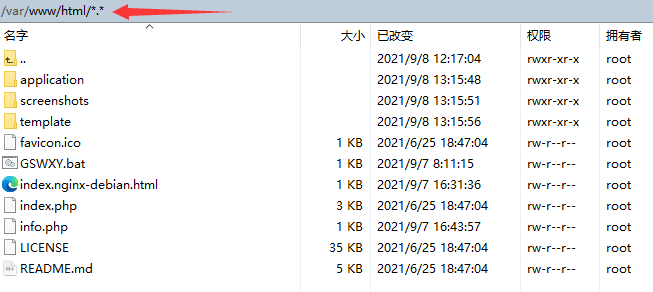
其余配置项目请自己酌情修改,修改完毕后将文件夹全部上传到 /var/www/html 目录,如图所示:
(三)开启 SOAP
vim /root/azeroth-server/etc/worldserver.conf然后输入 /SOAP 查找 SOAP 值,找到 SOAP.Enabled = 0 后回车按 i 键,修改为 SOAP.Enabled = 1,按 Esc 键输入:wq 后即可保存退出,重启服务端后即可使用网站注册账号。
该网站的地址为你外网 IP 地址,如果你想本机打开,请在浏览器输入 http://localhost。
(四)防火墙配置
魔兽世界服务端所需的端口为 3306、8085、3724、7878,SFTP 所需要的端口为 22,注册网站所需要的端口为 80。如果按以上教程搭建,外网仍无法访问,请自行查看服务器防火墙是否放行上述端口。
最后,如果有帮助到你,打个赏吧,有什么问题 QQ 群(938973736)交流。

 GSWXY
GSWXY






感谢分享,很好的教程